- Seamless authentication at login
- Group management works transparently with Windows Integration
- How to configure Authentication Intergration
- Add a Windows Intergrated group
- Adding unique settings to a user within the Integrated Group.
- Enforce special restrictions on a user
- Implementation of multiple domains with trusts
By enabling Authentication Integration for Windows, you can use ProVide to authenticate users with a Windows Domain or Server. This feature allows ProVide to utilize your existing Active Directory or Server user accounts, simplifying user management significantly.
In addition to simply reading users from Active Directory or the server, you can assign specific settings to individual users or groups within ProVide. This includes login limits, bandwidth management, and customized home directory contents and more. When applied to groups, these settings serve as defaults for all users in that group, making it much easier to manage thousands of accounts.
Seamless authentication at login #
Accounts and settings in ProVide always takes precedence and thus ProVide checks if the user…
- …exist as a regular account in ProVide?
- …exist as a Windows-connected account in ProVide?
- …pass Windows authentication?
Group management works transparently with Windows Integration #
Group management with hierarchical structures and multiple group memberships continues to apply to both user and group accounts in ProVide when using Windows Integration. Just as ProVide accounts can belong to multiple groups, the integration with Windows offers the same flexibility: If a Windows user is a member of several Windows groups, that user will inherit resources and security settings from all those Windows-integrated groups in ProVide. For example, the home directory for users logging into the server could be a composite of data from the “Management,” “Economy,” and personal groups.
A Provide group integrated into Active Directory allows the whole Active Directory group to login into ProVide. This can potentially allow several thousand users to log in into Provide, without a lot of configuration in ProVide.
In fact, the power of this integration far surpasses anything currently available on the market for file servers. Despite its robust capabilities, it remains an elegant and user-friendly solution.
How to configure Authentication Intergration #
To Enable Authentication Integration, follow the steps below and look at picture for additional clarity.
- Click “Details” menu.
- Then “Authentication Integration”
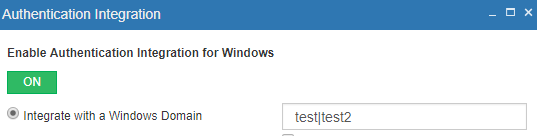
- Change OFF to ON under “Enable Authentication Intergration for Windows”
- Select either Windows Domain or Windows Server.
- By default, the name of the active local Active Directory (if one exists) / Server on the computer running ProVide is automatically entered into the domain/server field.
However, this can be changed to a remote Active Directory or Windows Server on the network if needed. - Should you wish users to use NTFS permissions by default, enable “Use Windows account impersonation by default”. This can be configured on a user and group level as well.

Add a Windows Intergrated group #
- Click Access
- Click Groups
- Then New Group

- Name the group to the same name as the Active Directory / Server group
In the picture below we use Economy. - Switch “Windows group integration” from OFF to ON.
- Add a Home directory for the group that the users belonging to the group have access too.

When defining a Home Directory to a group its handy to use the %USERNAME% token to allow users to have their own personal folder as their home directory in ProVide. This ensures that users within the group cannot access each other’s files. Since you can add multiple resources, you can also include shared resources alongside individual home directories.
Alternatively, you can use the special tokens %AD_DISPLAYNAME%, %AD_HOMEDIR%, %AD_COMMENT%, %AD_SCRIPT%, %AD_PHONE%, and %AD_MAIL% to access the corresponding information from your Active Directory for the currently logged-in user.

In the Security tab, you can choose to override the default settings for the group. This option allows you to customize settings that differ from those defined in the Authentication Integration window.

Now that the basic settings are configured, a user belonging to the group should be able to log in using their Server or Active Directory account.
Adding unique settings to a user within the Integrated Group. #
With Active Directory integrated users you can allow only specific users to login You can also combine the use of groups and user as the example below.
Example. You have an Active Directory group named Users with the users A, B & C in it.
- Create a new group in ProVide and call it Users.
- Enable Windows group integration to integrate the group with Active Directory.
- Give the ProVide group a Resource Which A, B & C will be able to access.
- Now all three users will be able to access that resource, but you want C to be able to access a resource that A & B should not be able to.
- Create a user named C and select Status Use Windows Permissions.
- Add the resources you want C to be able to access.

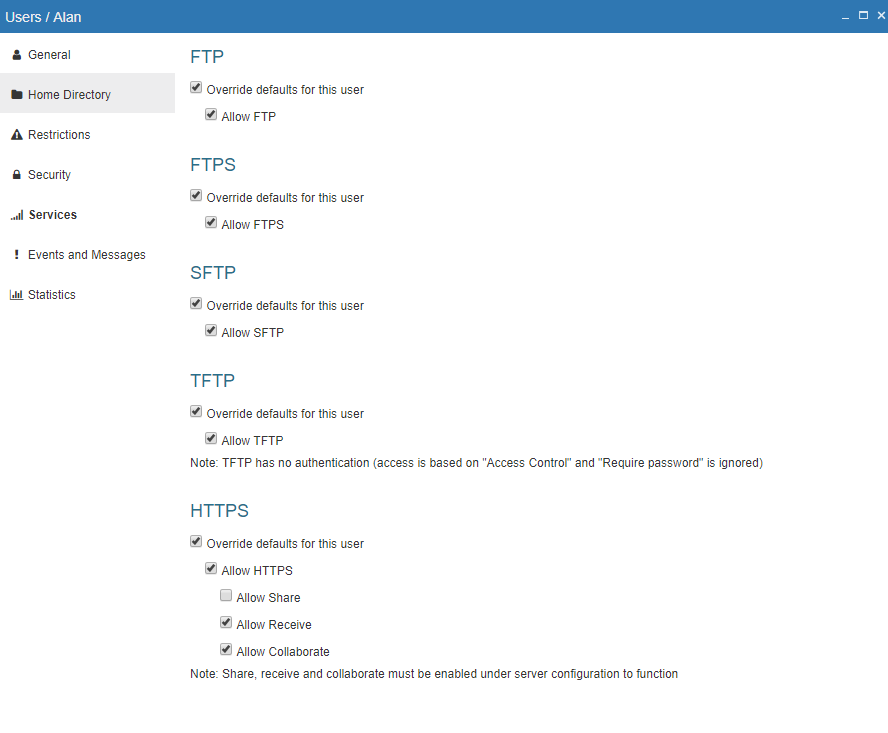
Enforce special restrictions on a user #
The Active Directory user “Alan” has access to very business-critical documents. If “Alan” is going to use the file server we must enforce him to use secure connections to make sure the documents are not intercepted during transmission.
- The user “Alan” already exist in Active directory
- Create a user called “Alan” in ProVide and specify this account to “Use Windows permissions”.
- Specify which service(s) should be allowed on the tab “Security”.
Implementation of multiple domains with trusts #
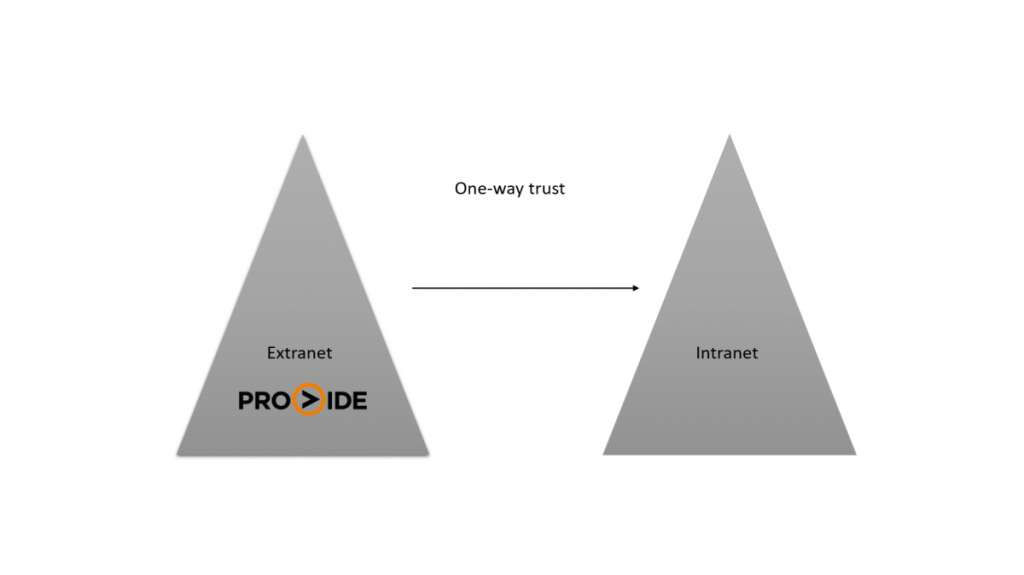
To make ProVide work with multiple domains, a trust between domains have to be established, and all domain names need to be entered into the Authentication Integration settings seperated by pipes.
A trust is a relationship between domains, which makes it possible for users in one domain to be authenticated in the other domain. You can read more about trusts at Technet.
Example with two domains #
In this example we have two domains where ProVide is installed on a server in the domain Extranet. Extranet trusts Intranet which means users from Intranet are able to access the server through their AD-accounts.
The ProVide service, which is installed on a server in the Extranet domain, has to be run as an admin from the domain Intranet (make sure the admin has enough permissions on the ProVide folder).
When the service is running as an admin from Intranet and both domains are added to the domain list (seperated by pipes(“|”)) users from both domains are able to access the server seamlessly!


